Sunday, March 27, 2016

Campfire Safety

As we all get ready to start camping or have already started.  I am reminded that in many parts of the USA you can not have a campfire do to outdoor burning restrictions.  So many of us remember the nights spent by the fire watching the sparks work their way up into the air from the burning logs and hearing the original snap, crackle, and pop. (sorry Kellogg)  Well, things have changed that's for sure.  First in many states now you can not bring firewood from one state to another or even from one part of a state to another do to bugs, worms, and what have you.  You must use the firewood that is at the park store or Ranger station.


How far is too far to move firewood? And what is meant by "local" firewood?  When discussing local firewood, I am referring to the closest convenient source of wood that you can find. That might be from down the street, or a state forest in your county. As a general rule of thumb, 50 miles is too far to move firewood, and 10 miles or less is the max firewood should be moved.  In many, states there are rules, regulations, and quarantines that clearly state how far is too far. Always acquaint yourself with local rules and regulations when transporting firewood from one jurisdiction to another.  Find out more here Don't Move Firewood .
So you buy some firewood from the Ranger's supply at the park and you can burn it during the time you are in the park but you should leave what you do not burn behind.
You have firewood from the local area and you have piled it up in the fire pit and you get ready to light it, but how do you get the green wood, high in moisture content, to burn without dumping a bottle of charcoal starter one it.  One fun idea is to use to get the wood burning is InstaFire .
These little fire starter pouches can get a fire going almost anywhere and burn hot enough to get not so great firewood started.

How can you make a campfire fun and exciting?  Well, S'mores are fun to make S'mores.

When you are done making the S'mores you might want to be amazed by the camp fire northern light show.  Camp Fire Northern Light Show .


Now sit back and enjoy the rest of the evening and watch the light show from your camp fire.

What happens when you can not burn wood but you still want to sit around a campfire.  Well, the solution for that is the gas campfire.  Most RV camping areas do not have a problem with the gas campfire even if there is a burn ban because the fire does not give off sparks and with the turn of the gas valve, the fire is off.  You can still make those S'mores the kids want and you can still enjoy sitting outside of the RV around the campfire.  See Portable Gas Campfire for what I am talking about.
This portable gas campfire runs off of LP gas either the little 1lb green cylinders (runs for 2hrs) or the 10lb gas tanks.  It runs for hours and the red cover is used for storage and to elevate the gas campfire off the ground.  Also, the red cover has the carry handle attached.  With an extra accessory, you can even cook on the campfire just like a fire log one.

With any fire outside you need to have a fire extinguisher at the ready just in case.  Not just for grass fires. Fire Gone White/Red Fire Extinguisher - 16 oz 


Until next time.


Don't forget to join the Weekend RVers group on Facebook a no DRAMA place with Hints, Tips, Free Stuff, Recipes, for every kind of RVer.


And finally, please remember that this blog is an Amazon affiliate. When you order something through any of the Amazon links, it doesn’t add anything to your cost, but I do earn a small commission on everything you buy. Just click on an Amazon link, then shop as usual.

Sunday, February 14, 2016

911, What Is Your Emergency? ------- Water!!!

Have you ever opened the Kitchen or Bathroom under sink cupboard doors only to find the contents wet or a bit damp?  To make  matters worse, you are dry camping (boon docking) and have no one around to ask what to do.  Well, wonder no more just keep reading to find out.


First you need to find the source of the leak.  This could be from water seeping around the top of the sink and draining inside the cupboard.  This is a simple and quick fix. Just use some Kitchen and Bath approved caulk, such as,
Follow the instructions on the tube and that water seepage should be a thing of the past.  I keep a tube of this product in white and clear in the RV all the time because you just never know.  But, what if that is not the problem?  
Next check all the black sewer pipes to be sure the fittings are good and tight.  The black drain pipe fittings should be hand tight not wrench tight.  Do be careful not to over tighten these fittings as you can break the pipe or strip out the plastic threads on the pipes.  I check these fittings every time in the Spring before the first camping trip and several more times during the year to be sure they are tight and doing just fine.  I did find a loose one in the Master Bathroom last year.  So all the black pipe fittings are tight and you still find water and things damp.  Now, what?
Well, there is really only one thing left.  The hot and cold water fittings.
From the picture above you can see the red (hot) and, in this case, the white (cold) water lines as well as the black plastic sewer pipes. Getting a bit closer, we see where the problem is.

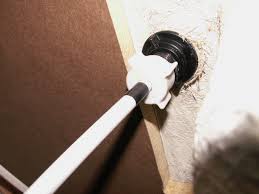
The metal clip that holds the screw on connector has come a bit loose and the water is dripping out from that fitting on to the stuff under the sink.  It is not a flood but a constant drip.  This scenario is not good for lots of reasons and needs to be taken care of right now.  If you do not have the PEX crimping tool you will never get the metal squeezed tight enough to stop the slow leak.  
There is a quick and sure fire way to fix this problem and end up with a far better connection than what the RV manufacture used.  It is called a Shark Bite connector.
This is a push-on type of connector for the plastic hose and does not need any special soldering or tool to install.  You just cut off the leaking end and push on the Shark Bite.  Screw the female end to the faucet and you are good to go.
Please note to double check that after you cut off the old leaking connection, that you will still have enough plastic pipe to reach back to the faucet once you put on the Shark Bite.  The plastic pipe used in most RVs is 1/2" and the Shark Bite Connector you will need is the 1/2" type.  This connector is available in most hardware stores and the Big Box retailers of plumbing supplies. The packaging looks like below.

The package and product at my big box retailer was not hanging just stuffed  into a box on the shelf so I had to look a bit for it. 
So here is what I ended up with.
You can see on the red plastic pipe what I had before the switch and you can see by the white pipe what I have now.  My plan is to change over the red pipe connector to a Shark Bite type to ensure no more future leaks from this area.

Here is a convenience add on that I bought, just to help in replacing future connections with Shark Bite.  It is called the Shark Bite Deburring Tool. After cutting the old fitting off the PEX plastic pipe you use this tool to deburr the pipe and the tool shows you how much of the plastic pipe you have to push into the Shark Bite connector to make a good water tight seal.
Again this tool is not mantatory.  It is just a nice convenience tool to have around.  One last tool you might want to pick up is the PEX plastic pipe cutting tool.  Again not a mantatory tool to have just a nice tool to have.
Well, that is it.  If you have a water leak anywhere even a constant drip you need to fix it fast and the Shark Bite pipe fitting system is the fastest and easiest system I know of.  I keep a couple around because you just never know when you will need them and the cost is cheap insurance against a faucet connection leaking and damaging the rig.


I would like to thank Michael Cook who's Facebook posting gave me the idea for this post.

Until next time.

Don't forget to join the Weekend RVers group on Facebook a no DRAMA place with Hints, Tips, Free Stuff, Recipes, for every kind of RVer.

And finally, please remember that this blog is an Amazon affiliate. When you order something through any of the Amazon links, it doesn’t add anything to your cost, but I do earn a small commission on everything you buy. Just click on an Amazon link, then shop as usual.

Saturday, December 26, 2015

How to Keep An RVer Warm

A lot has been said about how to keep your RV warm in the colder months so pipes don't freeze, sewer lines flow, and water comes out of the faucet.  But very little time has been devoted to discussing how to keep yourself warm and cozy. Let's take a minute to discuss that part of RVing.
I suppose many of you would say just turn up the heat and use more propane or add a fireplace to the RV if you do not already have one.  Maybe just add a BIG space heater.  Well, while those are good ideas you may have forgotten warmer air holds more moisture and adds to Mold growth.  Mold and moisture entering the walls of an RV are the death of the RV.  Most of us have a real investment to protect so raising the inside temperature is not always a good idea.


I suppose one way to keep warm is layering clothes but how many layers do you want on, just to read a book or watch TV? If you set the furnance to 69 or 70 degrees to keep air moiture down you will get cold in the feet and outer parts of the body. So you need to put on some socks and add some Snoozies to your feet


Polyester
Made with a brushed fleece exterior in colorful and fun printed patterns and then lined with a soft Sherpa fleece inside.
Non-skid sole so you can feel safe wearing them on wood or tile floors.
S (5-6), M (7-8), L (9-10), XL (11-12).
Keeps feet warm even on the coldest of days.
Many patterns to choose from.

Now that we have the feet warm we need to get the rest of the body warm.
This type of blanket heats just you and not the whole RV which saves on electric cost.

You say your ears are cold.  Then let's look into solving that problem.

Self-Regulating Ceramic Element
Automatic Overheat Protection
Maximum Heat Power: 1.50 kW
Lower power usage saves on your energy bill and helps to eliminate tripping the circuit breaker if multiple heaters are used in an RV setting.
Energy-Smart, uses only 200 Watts
3.8" x 4.3" x 6.1" tall. Fully assembled.
ETL listed
Safe ceramic element, overheat protection, and cool-touch housing.
This type of heater does not heat the whole RV just you.  That will save the bucks.  This is a personal heater and can be used at bedtime as well to heat you while you sleep.

What if you read in bed under the covers and, of course, the bed is cold when you get into it and anytime you would move your feet you would freeze.  What to do?
A heated mattress pad sends heat up through the sheets to you rather than down through the blankets to you. So it uses your own body heat as well as its' own heat to keep you warm and cozy.  If you move your feet they are still warm as the heat from the pad rises.  This is a very efficient system and the cost of operating the Heated Mattress Pad is also very low.
You turn of the mattress pad about 15 minutes before going to bed for a warm reception when you crawl in.

You could add a pair of nighttime Sweats to your wardrobe and put them on during the evening hours to help keep you warm.  There are hundreds of styles and as many prices for this type of clothing and you can even shop online to save a buck or two on gas.


Until Next Time


Don't forget to join the Weekend RVers on Facebook a no DRAMA place with Hints, Tips, Free Stuff, Recipes, for every kind of RVer.

And finally, please remember that this blog is an Amazon affiliate. When you order something through any of the Amazon links, it doesn’t add anything to your cost, but I do earn a small commission on everything you buy. Just click on an Amazon link, then shop as usual.